Wednesday, October 6, 2021

Install mysql with docker in your local machine (ubuntu 20.04)

I had to use another laptop for some days and I didnt want to install packages that left garbage behind when moving away from this machine.

These are the two guides I followed for reference : 

 Preparation

In my case docker was already installed. docker can run from my user, so no need to append `sudo` to any `docker` command

Install mysql server via docker

The key here is to use the official mysql package from docker hub

# https://hub.docker.com/_/mysql
docker image ls
docker pull mysql:latest
docker image ls

# create a volume in local machine
docker volume create mysql-data
docker volume ls
docker volume inspect mysql-data

# map a local directory to host the config
mkdir -p /home/jesus/projects/docker/mysql-volume/conf.d
echo -e '[mysqld]\nmax_connections=100\nmysqlx= 0' > /home/jesus/projects/docker/mysql-volume/conf.d/my-custom.cnf

then create the container

docker run \
--detach \
--name=mysql_server \
--publish 3306:3306 \
--volume=/home/jesus/projects/docker/mysql-volume/conf.d:/etc/mysql/conf.d \
--volume=mysql-data:/var/lib/mysql \
--env MYSQL_ROOT_PASSWORD=root \
--env MYSQL_ALLOW_EMPTY_PASSWORD=yes \
mysql:latest

docker ps
docker logs mysql_server

change root password

# access to the container in interactive mode
docker exec -it mysql_server bash


#supply initial root password (to enter mysql inside the container)
mysql -uroot -proot

# SET PASSWORD FOR 'root' = 'something-super-secret';
SET PASSWORD FOR 'root' = '';
FLUSH PRIVILEGES;

# enable docker access from anywhere (probably the image has this already)
UPDATE mysql.user SET host = '%' WHERE user='root';
FLUSH PRIVILEGES;

Install mysql client

Install the client in your machine that accesses the mysql server running in the docker container. For other distributions adjust the method to install the mysql client (only the client is needed). The mysql site provides that information.

First, add the mysql repo. Go to https://dev.mysql.com/downloads/repo/apt/ and get the latest repository available. In my case (@2021-10-01). Adjust the .deb package accordingly.

# add the repo
wget https://dev.mysql.com/get/mysql-apt-config_0.8.19-1_all.deb
#Click OK with the default options or select which mysql you want
sudo dpkg -i mysql-apt-config_0.8.19-1_all.deb
rm mysql-apt-config_0.8.19-1_all.deb

# install the client from the repo
sudo apt-get update
sudo apt-get install mysql-client
# sudo apt-get install mysql-server

ensure it works

mysql -uroot -h127.0.0.1 -P3306
# or with password
# mysql -uroot -p -h127.0.0.1 -P3306

😄 Fin!

P.S. Useful commands

docker start mysql_server
docker stop mysql_server
docker restart mysql_server
docker ps
docker volume inspect mysql-data
docker container ls --all

mysql -uroot -p -h127.0.0.1 -P3306

# dangerous!
docker rm mysql_server
docker volume rm mysql-data


Wednesday, October 23, 2019

Pattern to solve circular dependencies in node,

This is an useful pattern to avoid circular dependencies while requiring other files in node.

Circular dependencies manifest when a require returns an empty object: "the circular dependency means that other code receives an incomplete module object"

The solution is to 'augment' the exports instead of replacing it. 
So, if another module got a reference to the exported members they are eventually completed.

//requires at the beginning, as usual
//.. 


const PublicMethods = {
 method1: () => {},
 method2: (x) => {...},
 ...
]; 

// -- private & other methods
... 
...

//augment the exports at the end of the file:
Object.assign(module.exports, PublicMethods);


Wednesday, August 23, 2017

Get Response Time with Curl - curltime

Save this script in your path  (echo $PATH) as curltime:

#!/bin/bash

/usr/bin/curl -o /dev/null \
-s -w "    time_namelookup:  %{time_namelookup}\n       time_connect:  %{time_connect}\n    time_appconnect:  %{time_appconnect}\n   time_pretransfer:  %{time_pretransfer}\n      time_redirect:  %{time_redirect}\n time_starttransfer:  %{time_starttransfer}\n                    ----------\n         time_total:  %{time_total}\n" \
$1


Make it executable

chmod 0755 /usr/local/bin/curltime


Now you can use it to check the response time of an url. Ex:

curltime https://marca.com

Source: based on https://viewsby.wordpress.com/2013/01/07/get-response-time-with-curl/

Wednesday, June 14, 2017

Merge 2 commits when there are commits in between

Super handy trick based on based on https://stackoverflow.com/questions/30704254/merge-two-commits-where-commits-are-between

Lets say we have 2 commit we want to merge

f68ffb5 commit 6
...
d294fac commit 1


This is important: you have to give reference to a commit before the first one involved (in this case, the one that you want to squash to). Here we make the "before" reference with ^.

# rebase to the commit **before** commit 1
git rebase -i d294fac^

You invoked an interactive rebase. An editor window opens. Rearrange commits as desired (read the notes in the editor that opens)

In this list the commits go in reverse order (not as in git log): from the earliest to the latest.

Rearrange lines in the following way:

pick d294fac     //--- commit 1
squash f68ffb5   //--- commit 6
pick       //--- commit 2
pick       //--- ommit 3
pick       //--- commit 4
pick       //--- commit 5


or (leave the squashed commits in last place)
pick d294fac     //--- commit 1
squash f68ffb5  
//--- commit 6
pick      
//--- commit 2
pick      
//--- ommit 3
pick      
//--- commit 4
pick      
//--- commit 5

Tuesday, September 6, 2016

Back In Time: Backups for your personal computer


'Back in Time' ( http://backintime.le-web.org/ ) is a linux program to make regular backups. I recommend it.

Why?

  • simple. Linux only.
  • it uses incremental backups and hardlinks, saving time and space between 'snapshots'
  • 'snapshots' are saved as folders. Each snapshot is seen as a 'copy' of the system at a given time, but you still can get the 3-weeks ago version of a file, just by moving inside the file-tree of the snapshot. This is key: you can plug your backup drive to another computer and access the snapshots from the file explorer. No need to install anything to read the backup
  • autoremove old backups based on age or free space
  • backups are made to a drive or a remove machine (ssh). No cloud storage option (S3, box, etc)
  • handles backups of several machines with no extra configuration. Snapshots of different machines are stored in different folders
  • Just works


How I use it

(for all my computers) I run Back in time backups on demand (not scheduled) and unencrypted. Both options are available if needed.
Backups are stored in a ext4 external drive (ext4 is linux native but still read-accessible from OSX and Windows)


Install

This works for ubuntu. For others, go to the original http://backintime.le-web.org/

sudo add-apt-repository ppa:bit-team/stable
sudo apt-get update
sudo apt-get install backintime-gnome
Note: latest versions are only qt-based. You could install the `backintime-qt4` package instead `backintime-gnome`

Configure

Connect the external drive for the backups, and launch Back in Time. The first time you need to configure how to make backups for the computer (accessible from settings / preferences as well).


In the settings, you need to set where and when to save snapshots. For example I choose

[General] tab
  • Profile: Main profile
  • Mode: local (or local encrypted)
  • Where to save snapshots / destination: your drive , partition or subfolder.
  • Schedule disabled. I will save a new snapshot on demand
[Include] , [Exclude] tab
I usually include the home folder, or just the Documents, Pictures and .ssh folder. I exclude the Music and Videos folder.

[Autoremove]
defaults are good for me

[Options] 
  • Check Use checksum to detect changes
  • Check Full rsync mode (or not)
  • Check Backup replaced files on restore
  • Uncheck 'continue on errors'


[Expert options]

  • Uncheck any option related to cron
  • Check ‘Run ionice’ when taking a manual snapshot
  • you may check 'Preserve ACL' ( as src and dst are Ext4, otherwise uncheck ). I finally uncheck it since gave me errors for some of my files


-


Save configuration > OK

New backup

You can make a new backup clicking on the 'disk' icon on the main toolbar. The first backup might take some minutes. Newer snapshots execute faster.


In case you need to back up files with special permission, you might need to run your backintime with sudo. The profile id is in the Settings > General , in the Advanced section

sudo -i backintime-qt4 --config ~/.config/backintime/config --profile-id 1

Uninstall

sudo ppa-purge ppa:bit-team/stable
sudo apt-get remove backintime-*

Saturday, September 3, 2016

Nautilus: Add touch action in context menu

This is a modification I make to nautilus in every computer I own.

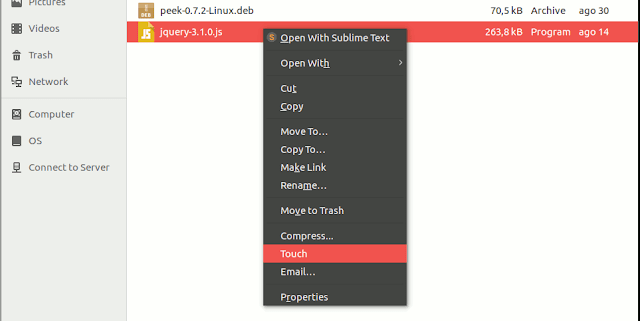
Just make a 'touch' option available when you select a file or folder. This tutorial can be modified to include other commands as well. I have used it for Ubuntu 12.04, 14.04 and 16.04.


First, install nautilus actions

sudo apt-get install nautilus-actions

and launch it.

nautilus-actions

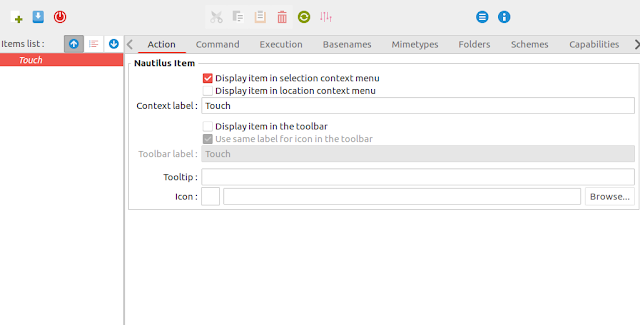
(1) Create a new item
  • Create the item using the '+' icon and name the action (Ex: 'Touch'). Use a short name, since it is used in teh context menu
  • Edit Action and Command tabs accordingliy. Ex:
    • Path: /usr/bin/touch
    • Parameters: %F (see Legend button to get more options)
    • Working directory: %d
  • Save (icon save)


(2) Right click on the new action that appeared in the Item list area
  • go to preferences
  • Ensure the 'Nautilus menu layout' > 'Create a root...' is disabled

Restart Nautilus
pkill nautilus


Well done!

Sunday, July 19, 2015

How to determine the time zone of an IP in Ruby

In ruby / Rails, you may need to get the timezone of an ip address.

One of the best options is the Maxmind.com GeoIP . The solution provided here applies to geolocate an IP address to get the timezone, country, city etc

Local or Remote

For better results I recommend to use their web service to geolocate a city : http://dev.maxmind.com/geoip/geoip2/web-services .
The service is not free but you can pay 20$ for 50K resolutions. Fair enough.
I write a new post on how to query the web service.

Another option is to resolve the geolocation locally. Maxmind provides a free database that is updated every month. As a free product, it is less accurate than the web service but gives good results. http://dev.maxmind.com/geoip/legacy/geolite/

Local set up

We need:
- download the database
- include the `geoip` gem, that will read the database
- our code to query the geoip gem
- link back to Maxmind

Download database

Read http://dev.maxmind.com/geoip/legacy/install/city/ for instructions. It boils down to:

cd /tmp
wget -N http://geolite.maxmind.com/download/geoip/database/GeoLiteCity.dat.gz
gunzip GeoLiteCity.dat.gz
mv GeoLiteCity.dat /usr/local/share/GeoIP/

I recommend you to make a bash script with these commands and run a cron once a month

Required gem


To read the legacy GeoIP database I recommend the pure ruby geoip gem. Just include in your Gemfile
 gem 'geoip'

or
 gem install geoip

Boilerplate

The interface of GeoiP gem is really simple however, as we are using a database with less than 100% accuracy, we should account for cases where timezone is not available.
When a ip resolves to a location without timezone, the best trick I found was to try with 'enclosing' networks (bigger supernets) until a result has timezone. That is: first try a perfect match, then try for the network with the last bit of the address masked, then mask 2 bits ...  https://en.wikipedia.org/wiki/Subnetwork#Subnet_and_host_counts


class Ip2Geo

  DB_PATH = '/usr/local/share/GeoIP/GeoLiteCity.dat'

  def timezone(ipv4)
    if ipv4.present?
      addr = IPAddr.new(ipv4.to_s.strip)
      32.downto(16).map do |mask| #if an address fails, test with enclosing network X.X.X.X , X.X.X.0 , X.X.0.0 ...
        network = addr.mask(mask).to_i
        c = db.city(network)
        if c && c.timezone
          return c.timezone
        end
      end
    end
    nil
  end
#a similar pattern can be re-used
  def country_code(ipv4)
    if ipv4.present?
      candidate = ipv4.to_s.strip
      addr = IPAddr.new(ipv4.to_s.strip)
      32.downto(16).map do |mask|
        network = addr.mask(mask).to_i
        c = db.city(network)
        if c && c.country_code2
          return c.country_code2
        end
      end
    end
    nil
  end

  def location(ipv4)
    if ipv4.present?
      candidate = ipv4.to_s.strip
      addr = IPAddr.new(ipv4.to_s.strip)
      32.downto(16).map do |mask|
        network = addr.mask(mask).to_i
        c = db.city(network)
        return c if c
      end
    end
    nil
  end


  def db
    @db ||= GeoIP.new(DB_PATH)
  end

end

To resolve the ip

locator = Ip2Geo.new
locator.timezone('193.110.128.199')

Attribution

Remember that the use of the free database requires an attribution: The attribution requirement may be met by including the following in all advertising and documentation mentioning features of or use of this database 
This product includes GeoLite data created by MaxMind, available from http://www.maxmind.com